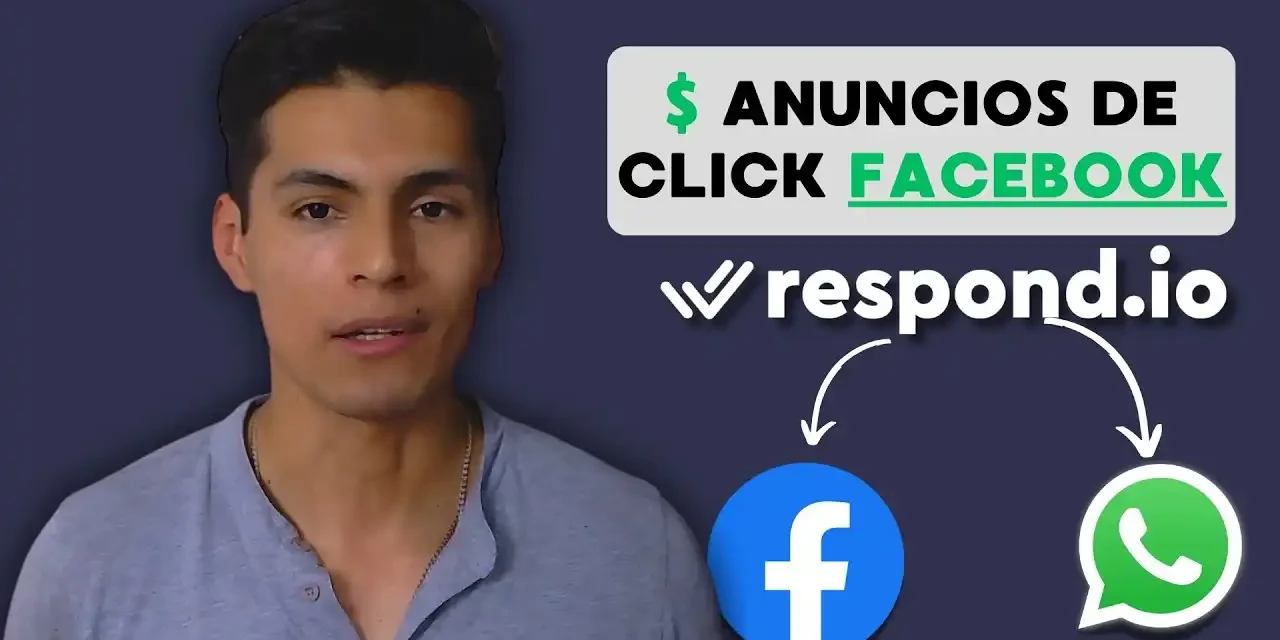
Si quieres convertir el interés por las redes sociales directamente en conversaciones de ventas, necesitas una estrategia inteligente. Meta (Facebook e Instagram) Los anuncios de clic en WhatsApp eliminan los pasos entre ver un anuncio y hablar con una empresa. En lugar de rellenar un formulario complicado, un cliente potencial hace clic en el anuncio y abre un chat instantáneamente en WhatsApp. Esto facilita y acelera la compra. Te mostraremos cómo configurar estos potentes anuncios en Meta Ads Manager. Luego los conectaremos a un flujo de trabajo respond.io. Este flujo de trabajo gestiona automáticamente las preguntas de ventas, entrega información sobre productos, gestiona pagos e incluso responde a preguntas frecuentes complejas (FAQs) utilizando Inteligencia Artificial (IA). Este proceso te ayuda a cerrar ventas rápidamente, incluso cuando estás ocupado.
Configurando tu anuncio de Click-to-WhatsApp en Meta
Crear el anuncio es el primer paso. Debes configurar el anuncio para dirigir el tráfico directamente al número de WhatsApp de tu empresa. El objetivo de esta campaña es lograr un cierre de venta directamente dentro del entorno de chat de WhatsApp.
Mejores prácticas creativas para Meta Ads
Cuando crees tus imágenes publicitarias, presta mucha atención al formato. Usar el tamaño creativo adecuado garantiza que tu anuncio luzca bien dondequiera que aparezca.
- Formato cuadrado: Si publicas imágenes en el formato estándar 1080×1080 (cuadrado), funcionan bien para la ubicación de los feeds principales.
- Formato vertical para historias y reels: No permitas que Meta recorte automáticamente tu imagen cuadrada para Historias y Reels. Si usas un creativo cuadrado en posición vertical (como Stories), a menudo parece cortado o mal enmarcado. Para solucionarlo, debes subir una creación vertical separada específicamente para colocaciones de Historias y Reels. Un creativo vertical encaja mejor en la pantalla y se ve mucho más profesional.
Una vez que tus creativos y textos publicitarios estén listos, puedes enviar el anuncio para su revisión. Meta revisa todos los nuevos anuncios para asegurarse de que cumplen sus políticas. Este proceso puede llevar tiempo. Una vez aprobado, tu anuncio empezará a emitirse en Facebook e Instagram.
Centraliza tus conversaciones con Respond.io
Gestiona mensajes de WhatsApp, Instagram, Facebook y más en un solo lugar con Respond.io. Automatiza respuestas, asigna clientes a tu equipo y mejora tu atención al cliente con IA y flujos inteligentes. Ideal para empresas, agencias y equipos de soporte que buscan eficiencia real.
- • Integración con más de 10 canales de mensajería
- • Automatizaciones con IA y flujos personalizados
- • CRM integrado y métricas en tiempo real
- • Planes para equipos de todos los tamaños
Enlace de afiliado. Recomendación informativa sin obligación de clic.
Vincular Meta Business Manager con respond.io
Para que la automatización funcione, tu cuenta de Meta Business debe conectarse correctamente a respond.io. Este enlace respond.io permite gestionar las conversaciones que surgen de tu campaña publicitaria.
Sigue estos pasos para establecer la conexión:
- Ve a la sección de Configuración en respond.io.
- Selecciona Integraciones.
- Haz clic en el botón para Meta Business Accounts.
- Selecciona Gestionar.
- Introduce el correo electrónico y la contraseña de tu perfil de Facebook. Este perfil debe ser el que gestiona tu Meta Business Portfolio, tu cuenta de WhatsApp, cuentas de Instagram y cuenta de publicidad.
- Sigue las indicaciones para conectar Meta con respond.io.
Después de completar estos pasos, la integración aparecerá activa en tu cuenta respond.io.
Construyendo el flujo de trabajo automatizado de ventas en respond.io
El objetivo principal de usar respond.io es automatizar la conversación de ventas. La plataforma crea un «flujo de trabajo» (o chatbot) que guía al cliente desde su primer clic hasta la compra final o a un agente para recibir ayuda humana.
Configurar el desencadenante de la conversación
El flujo de trabajo debe comenzar solo cuando un cliente proviene de la campaña publicitaria específica que acabas de lanzar.
- Ve a la sección de flujos de trabajo en respond.io.
- Abre el flujo de trabajo que quieras.
- Haz clic en la opción Disparador a la derecha.
- Cambia el disparador predeterminado de «Conversación abierta» a Anuncios de clic para chat.
- Selecciona tu cartera de Meta Business.
- Selecciona tu cuenta de publicidad específica.
- En «Anuncios seleccionados», elige la campaña que estás dirigiendo actualmente en Meta. Todos los anuncios activos dentro de esa campaña ahora activarán este flujo de trabajo.
Cuando un cliente hace clic en tu anuncio, el flujo de trabajo se activa y la conversación automatizada comienza inmediatamente en WhatsApp.
Diseño del mensaje inicial y opciones
El primer mensaje debe saludar al cliente y ofrecer opciones claras. Esto guía al cliente por el camino adecuado según sus necesidades. Asegúrate de que el canal de WhatsApp usado en el flujo de trabajo sea el mismo que está vinculado a tu anuncio de Meta.
Un primer mensaje eficaz podría ser así:
«Hello [Contact Name]. Thank you for your interest in the MegaPack of 2,000 Sales, Marketing, and Personal Growth Books. Before we continue, please choose the option that describes your situation.»
Example options you can provide:
- I am from [Your Country, e.g., Peru] (For local pricing and payment methods).
- I am from another country (For international pricing and specific payment platforms like Hotmart).
- I have frequently asked questions (FAQs) (To activate the AI Objective).
Creating the Local Sales Path (Example: Peru)
The workflow needs to branch out based on the customer’s location. For local customers, the process is streamlined for common local payment methods.
- Send Product Information: Immediately send a message detailing the product, including its price and features.
- Add a Wait Step: Introduce a short wait period (e.g., 12 seconds). This allows the customer time to read the initial message before the next message arrives.
- Deliver a Detailed Video: Send a video explaining how the customer will access the digital product (e.g., how to download the PDF books). This manages expectations and reduces later questions. Send the video file directly as an MP4.
- Send Payment Method: After another short wait (e.g., 12 seconds), send the local payment details (like bank transfer information). You can set a longer wait time here (e.g., 4 minutes) so the customer can review the video and payment details without interruption.
Confirmation and Purchase Follow-up
After the wait time, the workflow asks the crucial confirmation question.
The question should be simple:
«[Contact Name], please confirm one of the following: I made the purchase or Later.»
The workflow then branches based on the answer:
If the Customer Chooses «I Made the Purchase»
- Request Proof of Payment: Send a message asking the customer to upload a screenshot of their payment receipt.
- Assign to a Human Agent: This is a crucial automation step. Immediately assign the conversation to an available human agent on your team.
- Configure Agent Assignment:
- Assign to users in a specific team (e.g., the Marketing Team).
- Use balanced distribution so the workload is shared equally.
- Ensure assignment only happens to agents who are online (to prevent delays).
- Send Automated Agent Message: Once assigned, the system should send an automated welcome message from the human agent. This message should include the agent’s name (using a variable) and a promise of assistance, for example: «Hello, I am Agent [Agent Name]. I am here to help you finalize your purchase.»
If the Customer Chooses «Later»
The workflow sends a reminder message encouraging them to return. For example: «I understand. Remember, the offer is for a limited time, so don’t miss out.»
Creating the International Sales Path (Example: Other Country)
For customers outside your local market, the payment steps change. This path ensures they get the correct information for international transactions.
- Send Product Information: Share the product details and price in the appropriate currency.
- Deliver Hotmart Link: Send the URL where they can make the purchase internationally, such as through a platform like Hotmart.
- Send Step-by-Step Purchase Video: Immediately send a video showing them exactly how to complete the purchase on the external platform (Hotmart). This guide minimizes potential confusion or errors during checkout.
- Confirmation and Help Request: After giving them enough time to complete the purchase (e.g., 5 minutes), ask for confirmation:»We are glad you are interested, [Customer Name]. Please confirm the following: I made the purchase or I need help.»
If the Customer Chooses «I Made the Purchase» (International)
Send a final confirmation message reminding them to keep their email and password secure for unlimited access.
If the Customer Chooses «I Need Help»
This option directs them to the AI Objective, which is designed to answer complex questions if the guide video was not enough. You can connect this step to the AI Objective using the «Jump to Another Step» feature in respond.io.
Configuring the AI Objective for FAQs
One of the most powerful features of this setup is using AI to handle routine questions. This saves human agents time and provides instant support 24/7.
Setting Up Knowledge Sources
The AI needs knowledge sources to pull answers from. You provide these sources in the form of documents or website links.
- Go to AI Assistant.
- Click Manage Knowledge Sources.
- Click Add AI Knowledge Source.
- Give the source a name (e.g., «Megapack Questions»).
- You can upload a PDF file containing your FAQs, or you can paste the URL of a webpage containing the information.
It is critical that you structure your questions and answers clearly in the source document. This ensures the AI provides accurate and validated answers. Once the PDF or website is uploaded, it becomes the trusted source for the AI.
Activating the AI Objective in the Workflow
When a customer selects «I have questions» from the initial menu, they are directed to the AI Objective.
- Use the AI Objective Creator.
- Choose the option to Respond to customer questions.
- Select the Knowledge Source you just created (e.g., «Megapack Questions»).
- Do not allow the model to answer questions using information outside the selected knowledge source. This prevents the AI from making up answers.
- Allow the model to use snippets. Snippets are fragments of text from the source that the AI uses to formulate the best response.
Transitioning from AI to Human
After the AI has answered the customer’s questions, the workflow must provide a way for the customer to talk to a human if they still need help.
- Activate the option: Contact asks to talk to a human.
- Configure the assignment settings just like the purchase path (assign to a specific team, balanced distribution, only online agents).
- Send an automated message from the incoming human agent.
Handling Customer Inactivity
Sometimes customers start a chat but then become inactive. You need a system to follow up.
- Configure the Contact Inactive Branch in the AI Objective.
- Set a follow-up time (e.g., 5 minutes).
- If the customer does not respond within that time, send a brief message. For example: «Hello! Five minutes have passed. Do you still have a question?»
- Jump back to the AI Objective: This action sends the customer back to the AI Objective step. This re-engages the customer and lets them continue asking questions.
Conclusion: Publish and Monitor Your Automated Sales Flow
Una vez que hayas configurado meticulosamente los desencadenantes, las rutas de venta locales e internacionales, y el Objetivo de IA para las preguntas frecuentes, tu flujo de trabajo automatizado de ventas está completo. Este sistema garantiza que cada cliente que haga clic en tu anuncio Meta reciba asistencia inmediata y guiada, ya sea que esté listo para comprar o simplemente buscando información.
Haz clic en Publicar flujo de trabajo. Recuerda, este flujo de trabajo específico solo se activa por clientes que provienen de la campaña publicitaria exacta que enlazaste. Esto significa que no interferirá con otros flujos de trabajo de respond.io que puedas estar ejecutando. Después de publicar, supervisa tu panel de Control de Meta Ads Manager para ver si hay aprobaciones y revisa la bandeja de entrada respond.io. Verás interacciones en tiempo real con los clientes y las acciones que se toman por el flujo, asegurando un proceso de ventas rápido y eficiente.
¿Listo para automatizar tus ventas? Crea tu cuenta respond.io hoy mismo: Crea tu cuenta respond.io.


